Showing posts with label Luxury 5 Star Bed and Breakfasts. Show all posts

Sunday, May 23, 2010

One Grafton St, Site Visit

This has been a very busy few weeks for me and all of us at Moving Designz Home & Cottage.  The shop is filled with fabulous furniture and accessories and all of our design projects are progressing very nicely.  

 We've been working steadily at Number One Grafton getting the B & B ready for guests. Graeme and Judy, the owners and innkeepers, have been working very hard to get their dream business up and running and ready for guests. 

Today I'm going to post on... Suite 2 and Suite 3.  Suites 1, 4 & 5 are 99% complete and almost photo ready. 


This suite is done.  It's a lovely room for guests to relax, unwind and enjoy a good nights rest. 


This is a look at the fabric choices, the basis for the colour scheme of this suite. For the walls we chose BM Flagstaff, a warm grey brown.


I'm going to share more of the construction process with you.  In its original state this was a very good sized bedroom.  Lets do a little before, during and after..


The bedroom originally with its beautiful floors and bright yellow walls.


The tools have arrived and with them the process begins.  To the left of the firebox we took out a wall, added a door and through the door a new full ensuite bathroom... hence all those tools and pipes.


In this image the walls have been painted but there's still lots left to do.
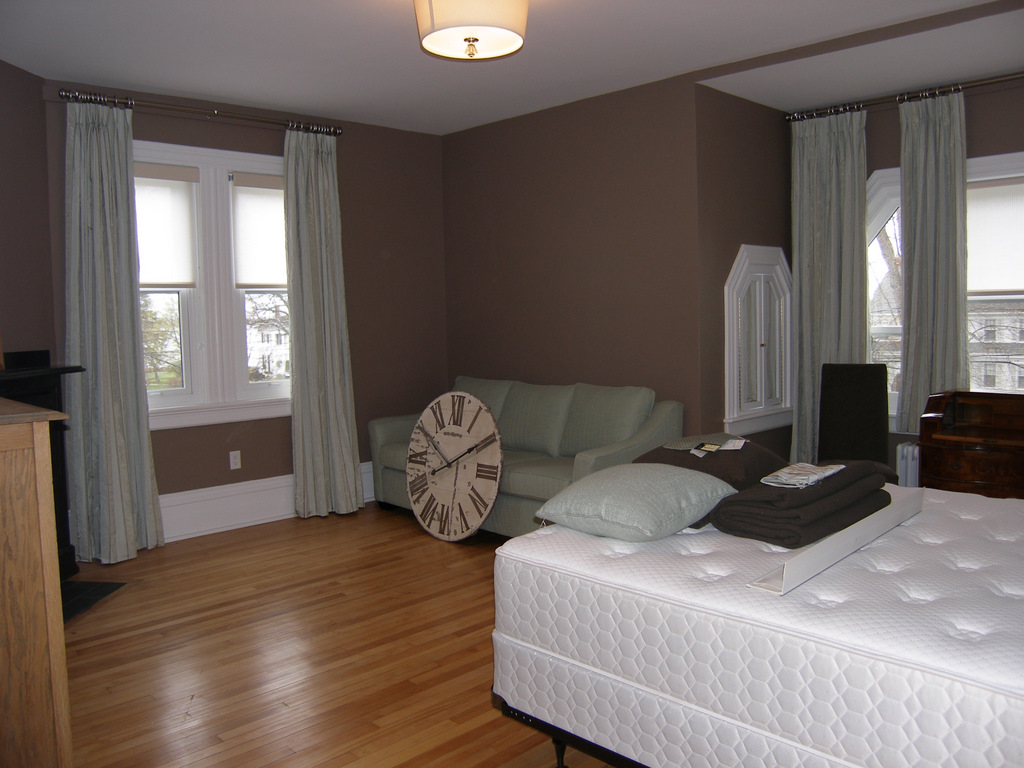

Fast forward 3 months and the custom window treatments are installed.  The new light fixture is up and furniture and accessories have arrived and are beginning to be placed.


Now the suite is completely finished (minus one floor lamp) and looking warm and inviting.  All of the window treatments, furnishings, accessories are from Moving Designz Home & Cottage.


A close up of the seating area.  The new floor lamp will be going into the corner and should be here next week!

An alternate view.


Before.


After. 

Now lets have a look at the ensuite bathroom.


This is a totally new room carved out of a former entry to the third floor.  The plumbing has just been roughed in.


And further along the walls are now painted, the new tile floor installed and the electrical is ready.


The ensuite is now completely finished and ready for guests.


Let's have a look next door at Suite 3.


The colour scheme for this sunny suite is greens, creams and blues.  Walls are painted BM Hazy Skies.


This picture was taken at the beginning of the project.  The pink had to go!!!


A further along and the walls have received one coat of paint and the floors are sanded for refinishing.


 The custom drapes are now hung, floors finished, bed is in and we're choosing art pieces to complement this rooms beautiful colours.  Still a few more pieces of furniture to come.


I had to show a close up of this art piece.  It's actually a piece silk kimono my clients picked up Malaysia and had framed.  It's stunning and looks beautiful in this rooms decor.  Also a nice close up of the drapery fabric, which is just beautiful.


This is now a finished room.  One more off the list :)


This suites bathroom was also totally gutted and rebuilt from scratch.  Originally the main door was off the hallway when it was an apartment.  The contractor opened up the wall to the right of the bed to create this ensuite.


 The stand up shower is a beautiful clean glass enclosure with sparkling hardware and crisp white subway tiles.  We also had a custom roman shade sewn with the same fabric in the rooms drapery.  In fact, we did this for all the suites.


Opposite the shower is where the jetted soaking tub was installed.


Fast forward a couple of months ... the walls are now drywalled and the floor tile is installed. 


Completely finished now :)  The exposure was more than a little off in this image... sorry.  I actually forgot my memory card for my SLR Nikon camera and had to take all the pics with my instant Olympus.  I found out you can't have too many cameras yesterday.


A close up of my clients beautiful Chinoiserie canister sets sitting on the tub deck. 

As you can clearly see each suite has it's own individual colour scheme.  However, I believe in keeping things simple, as do my clients, so many of the same finishes and details are carried through to every suite and ensuite.  


I have one last pictue to share.  The main entry is finally finished too.  What a welcoming site!   This project has been 2 years in the making and I am so happy to finally see everything come together. 


For details on staying at this luxury B & B in downtown Charlottetown,
Contact The Sheldons at 877-390-0111.  Website available for online bookings at http://www.onegrafton.ca/ 


Thanks for reading.  Have a wonderful weekend!
Susan

Friday, May 7, 2010

Grafton St Part Two: Suite 1

As promised I am continuing my house tour of Number One Grafton St.  It's a big post, it's a big project... be prepared :)  I was on site twice this week including this afternoon.  We are still working on placing furniture and artwork and waiting for the final pieces of furniture, bedding and accessories.  There are alot of decisions on what piece looks and goes in what room best.  Things have been moved in and moved out and moved somewhere else and then moved again.  We all have good strong arms, thankfully.  Who needs the gym, right?


Today I'm going to take you on a tour of a Suite 1 and let you join me in the construction and renovation process.  The logical place to start would be Suite 1 and a shot of the pre-renovation room. 


Suite 1.  It was pale purple and as much as some people I know like this colour (KJ) it didn't fit with our vision.  In fact, this room was a one room efficiency apartment.  The little kitchette and entry were located through that open door on the right with the bathroom on the right hand side of the room.   Many century homes became chopped up into apartments during the 60's and 70's and this was one of them.  This home had 3 rented units contained under its roof prior to my clients purchasing it.


At this point the room has been freshly painted...sorry my image is dark.  I'm going to spare you the pictures when this room became a warehouse and storage space for months during the renovation.


The drapes are up and the furniture is moving in.  However, today we decided to swap the cream loveseat with a larger cream sofa from one of the upstairs suites, after this picture was taken.  Next up close up of the colour scheme.  We're working with red, yellow and creams in this room.


The gorgeous drapery fabic under which each window has cream striped roller shade for daytime privacy.


The bedskirt fabric.  These are still being sewn as I write this blog post.  In fact all of the bedskirts are at our seamstresses being readied along with a couple more custom toss cushions for the sofa. 


This is the far wall and the former doorway that led to the kitchette and beyond that an entry point to the unit.


The door is now sealed up and this is the perfect spot for a headboard wall.  The antique wardrobe is stunning and the perfect scale for this room with its 11 ft ceilings.  Now where is that headboard?


Ahh .... here it is sitting on the floor and almost camouflaged by the floor.  In fact, this is next on the "to do" list.  For all you DIY'ers, this is a great project.  Take a solid wood panel door.  They come in an 80" length, cut 4" off the floor end and it will be perfectly symetrical and ideal for a hotel style king size wall mounted headboard.  On further posts you will notice we're using this technique in all of the suites.

One more look through that door that we closed up....


Here is the tired and dated kitchenette that was located through that doorway and tucked into a little closet.  This entire kitchen was ripped out, good riddance.  The door to the old apartment (on the right you cant see it) is now sealed and drywalled.  This is the office from my last post and open to the entry/foyer!  Let me show you what it looks like now from the same angle.


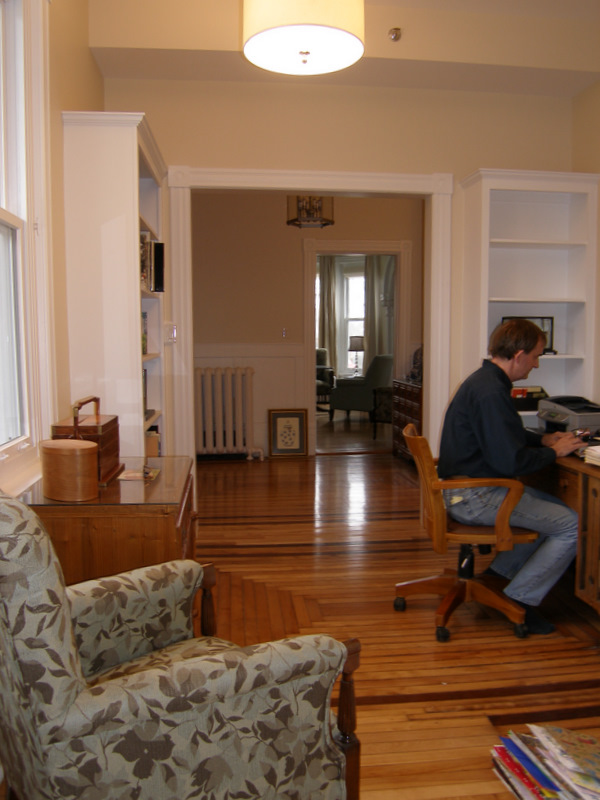
This is exactly the same view with the kitchette gone. It is now the office leading into the foyer which I showed in my last post.  And that is Graeme working away on his computer. 

The door that is now closed up would have been directly in front of him.  Look closely at the pattern on the hardwood floor, it's consistant right through to the foyer/entry.  In the original home this area was open to the foyer until at some point they chopped the place up into apartments and put in the kitchette.  So right now it's back to the way the builder built it last century.


Today I took a couple more pictures of the foyer with the light fixture I missed on my last post.  This is the view from the office now.


OK... I have to show you the foyer light fixture that was here pre-renovation and until the new light fixture was installed.  Which much to my amazement and my clients many people commented how nice it was.  We loved the ceiling medallion, it's fab,  but call us crazy ... we thought we could do better for a light worthy of this house.  And we did!


Now that's a light fixture fitting of a century home!  On to more of Suite 1, sorry I got off track.  Lets go back through the old door and look again at the pre-renovation room.


This is the old view and let me put this into perspective with another photo.  We had one big room with a door to the kitchette and the former entry area to the effeciency apartment on one side of the room.  And another door across the room to the washroom.


Just to the left of the fireplace is where the new doorway to the suite installed.


Same view looking toward the fireplace and washroom door with another beautiful light fixture up there too!


And now this is the view when you enter into Suite 1 beside the fireplace.  Like I said alot of walls were torn down or opened up and I haven't even taken you to the second floor yet !!!


The original bathroom from Suite 1.  This room was odd.  The original shower/tub combo on the right side of this shot had an outside window centered on the tub and believe me it was not in good condition.  This space had to be completely redesigned and rebuilt.


And this is how it looks now... the jetted soaking tub is front and center and has replaced the pedestal sink.


Looking to the left the new stand up shower is now in the place of the old linen closet.  The same look was carried throughout this house in all of the washroom for a consistant clean look.  Chrome fixtures, white jetted tubs with front panel detail and showers tiled in white subways tiles.  


This beautiful piece of original artwork is still to be hung and centered over the soaking tub.


I had to finish my post with the state of the art televisions... these 2 pieces of cardboard represent the 2 different sizes of flat screen tv's.  How will you ever know which size tv to use in which suite?  By using cardboard templates of course!  Totally Graeme and Judy's idea and totally brilliant.


I have just one last image to share with you.  This adorable seal was photographed by Graeme earlier this spring catching some rays on an ice floe at Panmure Island, PEI. 


More suites to follow up on in my next posts.... 2,3,4, & 5.


Thanks for reading.  Have a great weekend!
Susan


Over