Monday, May 10, 2010

My Closet Makeover

For todays post I thought I would share with you my closet makeover.  You see, I have one too many doors in my livingroom- doorway to livingroom, doorway to diningroom, doorway to bedroom, doorway to dressing room/bathroom and then this closet door stuck in the corner.  It really does not serve any purpose.  It's too far away for coats and tucked behind the chair it always looked kind of odd.  

As part of my house renovations, which have been going on for months and months, I decided to get rid of the door and have my carpenter install a built-in cabinet in its place. 


That's the closet right there in the corner.  The room looks good except for that and the ceiling which I still need to get done.


I snapped this picture after Mike ,my carpenter, had left for the day Thursday.  The door is gone now and outfitted with the unpainted cabinet.  A couple more moldings and it was done on Friday.  I'm loving it!


I primed and painted it myself on Saturday.  I usually try to avoid painting at all costs but I just couldn't stand looking at the bare wood and empty shelves all weekend.  And all of a sudden my room feels 10 times bigger.


I couldn't wait to fill up the shelves with pretty things.


  I still might swap out the upper shelf and the middle shelf accessories.  What do you think?


Thanks for reading.  Have a great week!
Susan

Friday, May 7, 2010

Grafton St Part Two: Suite 1

As promised I am continuing my house tour of Number One Grafton St.  It's a big post, it's a big project... be prepared :)  I was on site twice this week including this afternoon.  We are still working on placing furniture and artwork and waiting for the final pieces of furniture, bedding and accessories.  There are alot of decisions on what piece looks and goes in what room best.  Things have been moved in and moved out and moved somewhere else and then moved again.  We all have good strong arms, thankfully.  Who needs the gym, right?


Today I'm going to take you on a tour of a Suite 1 and let you join me in the construction and renovation process.  The logical place to start would be Suite 1 and a shot of the pre-renovation room. 


Suite 1.  It was pale purple and as much as some people I know like this colour (KJ) it didn't fit with our vision.  In fact, this room was a one room efficiency apartment.  The little kitchette and entry were located through that open door on the right with the bathroom on the right hand side of the room.   Many century homes became chopped up into apartments during the 60's and 70's and this was one of them.  This home had 3 rented units contained under its roof prior to my clients purchasing it.


At this point the room has been freshly painted...sorry my image is dark.  I'm going to spare you the pictures when this room became a warehouse and storage space for months during the renovation.


The drapes are up and the furniture is moving in.  However, today we decided to swap the cream loveseat with a larger cream sofa from one of the upstairs suites, after this picture was taken.  Next up close up of the colour scheme.  We're working with red, yellow and creams in this room.


The gorgeous drapery fabic under which each window has cream striped roller shade for daytime privacy.


The bedskirt fabric.  These are still being sewn as I write this blog post.  In fact all of the bedskirts are at our seamstresses being readied along with a couple more custom toss cushions for the sofa. 


This is the far wall and the former doorway that led to the kitchette and beyond that an entry point to the unit.


The door is now sealed up and this is the perfect spot for a headboard wall.  The antique wardrobe is stunning and the perfect scale for this room with its 11 ft ceilings.  Now where is that headboard?


Ahh .... here it is sitting on the floor and almost camouflaged by the floor.  In fact, this is next on the "to do" list.  For all you DIY'ers, this is a great project.  Take a solid wood panel door.  They come in an 80" length, cut 4" off the floor end and it will be perfectly symetrical and ideal for a hotel style king size wall mounted headboard.  On further posts you will notice we're using this technique in all of the suites.

One more look through that door that we closed up....


Here is the tired and dated kitchenette that was located through that doorway and tucked into a little closet.  This entire kitchen was ripped out, good riddance.  The door to the old apartment (on the right you cant see it) is now sealed and drywalled.  This is the office from my last post and open to the entry/foyer!  Let me show you what it looks like now from the same angle.


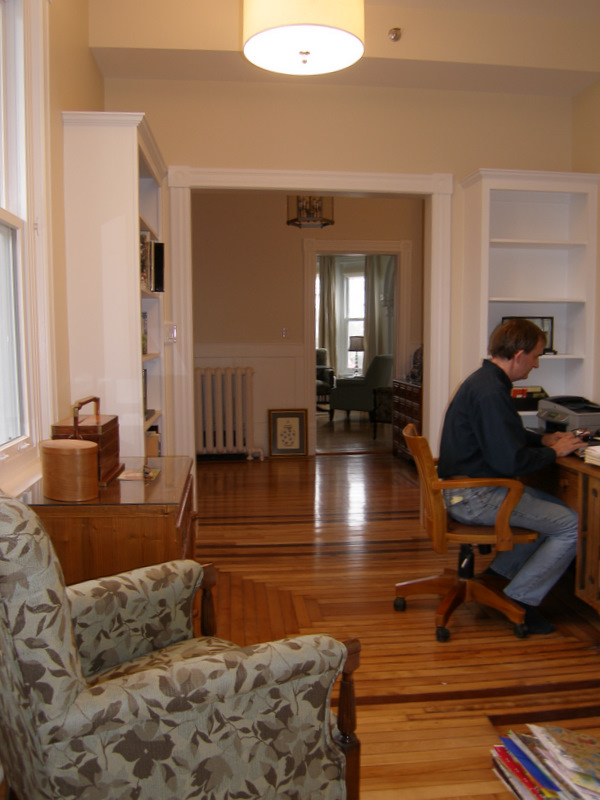
This is exactly the same view with the kitchette gone. It is now the office leading into the foyer which I showed in my last post.  And that is Graeme working away on his computer. 

The door that is now closed up would have been directly in front of him.  Look closely at the pattern on the hardwood floor, it's consistant right through to the foyer/entry.  In the original home this area was open to the foyer until at some point they chopped the place up into apartments and put in the kitchette.  So right now it's back to the way the builder built it last century.


Today I took a couple more pictures of the foyer with the light fixture I missed on my last post.  This is the view from the office now.


OK... I have to show you the foyer light fixture that was here pre-renovation and until the new light fixture was installed.  Which much to my amazement and my clients many people commented how nice it was.  We loved the ceiling medallion, it's fab,  but call us crazy ... we thought we could do better for a light worthy of this house.  And we did!


Now that's a light fixture fitting of a century home!  On to more of Suite 1, sorry I got off track.  Lets go back through the old door and look again at the pre-renovation room.


This is the old view and let me put this into perspective with another photo.  We had one big room with a door to the kitchette and the former entry area to the effeciency apartment on one side of the room.  And another door across the room to the washroom.


Just to the left of the fireplace is where the new doorway to the suite installed.


Same view looking toward the fireplace and washroom door with another beautiful light fixture up there too!


And now this is the view when you enter into Suite 1 beside the fireplace.  Like I said alot of walls were torn down or opened up and I haven't even taken you to the second floor yet !!!


The original bathroom from Suite 1.  This room was odd.  The original shower/tub combo on the right side of this shot had an outside window centered on the tub and believe me it was not in good condition.  This space had to be completely redesigned and rebuilt.


And this is how it looks now... the jetted soaking tub is front and center and has replaced the pedestal sink.


Looking to the left the new stand up shower is now in the place of the old linen closet.  The same look was carried throughout this house in all of the washroom for a consistant clean look.  Chrome fixtures, white jetted tubs with front panel detail and showers tiled in white subways tiles.  


This beautiful piece of original artwork is still to be hung and centered over the soaking tub.


I had to finish my post with the state of the art televisions... these 2 pieces of cardboard represent the 2 different sizes of flat screen tv's.  How will you ever know which size tv to use in which suite?  By using cardboard templates of course!  Totally Graeme and Judy's idea and totally brilliant.


I have just one last image to share with you.  This adorable seal was photographed by Graeme earlier this spring catching some rays on an ice floe at Panmure Island, PEI. 


More suites to follow up on in my next posts.... 2,3,4, & 5.


Thanks for reading.  Have a great weekend!
Susan


Over

Monday, May 3, 2010

Monday Field Trip to Grafton St

For this weeks post it's time to share progress at Number One Grafton St. 


This historic house has been pretty much completely gutted and rebuilt.  The house will be a 5 star Bed and Breakfast located in downtown Charlottetown and open for stays starting in June.  The renovations have been underway since last fall.  The construction phase is now done.  These past few weeks we've been focusing on putting the house together with the decorating phase and the final details.  This last week I was at the house inspecting the newly installed window treatments and assisting my clients with placing artwork, furniture and accessories.

I'm going to blog more frequently over the next two weeks on this amazing transformation.  It's way too big for one post!  We're still not quite done but within the next 3 weeks everything will be complete.  The final reveal will be amazing but for today I am inspired to show you where we are at now.  Lets look at the progrss in the entry, office and the lounge area. 


This was the original entrance to the house.  A small foyer with a closet front and center.  The staircase to the second floor was on the opposite side of this entrance.  It was decided to flip it to the main entry which opened up the entire space.


Plans were drawn and redrawn with careful calculations so that the staircase could be moved into the entrance.  No small feat to do this but it was achievable.  This image is just after it was framed out last fall.


A little further along and now we have a beautiful large entry. The wall to the right was removed.  I have to tell you there was once a small kitchen on the other side of that.  The kitchen was removed and once this wall came down this area was reconfigured to create a space for the open plan office.


Panel detailing was added to the walls to enhance the staircase.


And this is how it looked last week.  Not quite done but almost... we have a gorgeous mirror to mount above the chest.  When I post the final pictures I will have to be sure to include the entry light fixture.  I'm disappointed that I never got it in this photograph...darn it!  But it's worth waiting for in the final reveal.


I also missed getting a close up of the wall sconces going up the stairs.  This is what they look like.


I had to take a close up the my clients collection of stunning Chinoiserie and this beautiful antique tea chest. 


 Treasures from living on the other side of the world and perfectly suited to this grand home. 


This is the office space and one of the last areas to be completed in construction.  It became a kind of catch all space for the longest time.


This is the office now with a great seating area and lovely built in book shelves.  The desk area on the other side still needs some tweaking and wasnt quite ready for its photo debut but this side is looking great.  I'd say done.  Yay...


This is a close up of the fabric we used on the custom window shades.  It's from Kravet, pattern History, colour 16.  A soft pale yellow.  Stunning!


To the left of the entry you enter the lounge area.  This room was pretty great to begin with and there was no need to do any gutting here.  We had the room repainted, added a new light fixture, window treaments and new furnishings.  This photo was at the beginning of the project with the new energy efficient windows sitting in the room waiting to be installed.


The new seating arrangement in front of the bay windows.  The cream and pale yellow striped silk draperies look amazing and the furniture completes the picture.  I like this picture because you can see the original molding detail.  They truly are spectacular and original to this century house.  To the right is the diningroom which I will show you in another post.


Here I'm showing another angle of the same room early on.... with the new windows.


The furniture for all areas of the house has arrived in this shot.  Now we just have decide where everything is going to fit in and look best. 

 
Same angle with everything cleaned up and artwork waiting to be hung.  The lamps and side tables are next on the list.  It is a very lovely and welcoming room.  Perfect for guests.


One last look at the seating area in the lounge.  I think it's beautiful, fresh, airy and bright.  The settee has been freshly upholstered, the chairs are new and the table is a beautiful antique from France.  Stay tuned for more posts.  I can't wait to share the 5 very unique suites.  Here's a look at one of the fabulous drapery fabrics from Suite 4.


I actually had a big weekend which is why I am late posting.


Yeah ...thats me in my best I finally bought a new truck yesterday pose.  I know... I know it's really an SUV but I like saying truck.  It will be perfect for hauling cargo to the job sites.  I'm so excited I had to take it on a long drive today.  In case you're wondering it's a brand new Mitsubishi Endeavor.  And it's cream, I love it :)


Thanks for reading.  Have a great week!
Susan

Tuesday, April 27, 2010

Tuesday Site Visit

For todays post I'm going to take you on a field trip.  Once a week (more if required) I do a site visit to my SGG house, well, actually it's not really mine.  Lets start again... today I'm taking you on a visit to one of Moving Designz ongoing construction projects.  We've nicknamed it the SGG house. 


Work is progressing at a feverish pace, which was clearly evident by the amount of work vehicles in the driveway when we arrived today.


Bayside Builders, the general contrators and builders extraodinaire.  They are doing a top notch job.


And just around the corner,  3 more vehicles, one is clearly not visible in this photo but I assure you it is there.  The electricians are here as are the flooring and surface contractors Tops to Floors.


And another pleasant surprise!  Ralph is here, which means the staircases are getting installed.


Oh look, they rolled out the blue carpet for us.  Actually this blue film is a protective covering for the flooring that is being laid throughout the house.  Though technically a mudroom/laundry room there is no mud here.  I love that they cover the floors like this... it's a great extra step that some contractors miss.  It keeps the floors clean and protected.

A November flashback, in case you haven't been here with me before.  This is the great room.

A little further along our timeline and now the fireplace is framed and the drywall is installed.


Last Thursdays site visit.  The fireplace is looking WOW.  The last time I uploaded pictures the masons were hard at work applying the stone.  And that amazing light fixture is now up.  I just love it!  In this picture to the very right you can see the hardwood flooring has just started to go down, with more blue film.   


And the biggest reveal for today.  The striking railing and stairway system is well underway as you can see the bridge looks fantastic.  I along with most of the other people on site are happy and relieved to have this now installed.  It was getting kind of scary walking across it... as the barracades came down to allow for the flooring to be installed.


Ashley and myself striking a pose.  We're both fairly tall but as you can see we are completely dwarfed by the size of this fireplace.  We were busy checking on the progress and taking window measurements.  Custom built in cabinets will be installed on either side of the fireplace later this week.


Here's Ralph working on the other side of the bridge and the main staircase.


Craig from Tops to Floors busy installing the beautiful dark hardwood flooring.  Lets look at what else is going on in the house today.


Here we have Paul, the project foreman, and Sean checking the location of the diningroom light fixture box.  I think it might have to come a little to the left, like 12".  


Ronny from Tops to Floors holding up the master shower wall tiles.  We're laying them in a stacked vertical pattern.  Lets see who did we miss?  Ah yes, the electricians.

Guess they're both camera shy today.  That would be Dons legs and boots, I think it's Don but kind of hard to tell.  They were busy installing the electrical wires for the infloor heating system in the master bathroom. 

Lets look at some other work details that are getting checked off the to do list...


The guest bathroom shower tiles are done complete with a gorgeous glass tile detail band.


The girls bathroom showers are done with their pale blue glass detail border and shampoo niches.  On the floor we were checking out the tile pattern for the large grey tiles.  Yes, a perfect complement to the tile border!


Here I'm trying to show you a close up of the barrel vault ceiling in the great room which is completely finished in beadboard.  It's light and airy and lends itself to a seaside atmosphere.  On a house like this it is all in the finishing details... and everything is looking fantastic thanks to all the hard work by everyone on this job site.  Kudos to you all! 


The entry light fixture on the other side of the room is now installed too! 


This picture is just inside the entry below that fixture.  Now that that last high light is up, it's time to remove the scaffolding.  I hope someone remembered the lightbulbs...kidding!

 I hope you enjoyed the tour.  It's clearly obvious that the custom cabinetry is missing, plumbing fixtures and remaining lights need to be installed.  Yes there's still lots to do.  However with everyone working so hard it won't be long before we're delivering furniture and decorating this beautiful home.  In the meantime, I'm off to check on Number One Grafton, in Charlottetown, tomorrow.  This project is beyond the construction phase and the decorating has begun.  I hope to post some images on this fantastic soon to be open B & B over the weekend. 


Thanks for reading.  Have a great week!  
Susan